Monday, June 4, 2012
Wednesday, May 16, 2012
Designing Your Attitude
Let's face it. Some days we just wake up on the wrong side of the bed. Everything sets us off as if we are an angry, sad, and ferocious bears. The sun though it may be shining, looks dull and dreary and even our best cup of coffee doesn't knock away the blues. It happens. We all have these days.
I realized that even on days such as these, we are all still in control of our own attitudes. Even when we don't want to control our attitudes, we can consciously make the effort to readjust and start over mentally. I'm calling this process "designing your attitude." After explaining the process, I am including a printable graphic at the bottom so you can keep a reminder sheet handy on these bad days.
1. Take a deep breath
I realized that even on days such as these, we are all still in control of our own attitudes. Even when we don't want to control our attitudes, we can consciously make the effort to readjust and start over mentally. I'm calling this process "designing your attitude." After explaining the process, I am including a printable graphic at the bottom so you can keep a reminder sheet handy on these bad days.
1. Take a deep breath
Whatever
it is that has you on edge can’t keep you from calming down. Take a deep breath or two to remind yourself
that you are in control and to allow your body to naturally relax itself.
2.
Count to thirty
Why
thirty? Thirty seconds is an adequate
time to halt . . . long enough to stop your bad attitude in its tracks. Consider this your time to think. Think about why you are having a “bad day”
and decide if you want this to keep controlling your attitude.
3. Do
something nice for someone else
Sometimes
a bad day comes from an inward focus.
When we think all about ourselves, we are likely to be negative and
focus on what isn’t good about ourselves or our lives. Doing something nice intentionally, reminds
us that it’s not all about us. Let’s
face it; it is fun to make others smile!
4.
Brighten your space
If
you are in a dark area, brighten it up!
Open the windows on a sunny day, turn on lamps and overhead lights if it’s
dark outside. No one can cheer up in a
dreary, dark setting.
5.
Find some inspiration
Whether
you find an inspiring Scripture passage or an inspirational quote, give
yourself a boost of perspective. Here
are a few good places to look:
The Bible - John
10:10; John 16:24; Proverbs 17:22;
Helen Keller - "Keep
your face to the sun and you will never see the shadows."
Franklin D. Roosevelt
- “When you get to the end of your rope. Tie a knot and hang on.”
Mark Twain - "The
secret to getting ahead is getting started."
Winston Churchill - "A
pessimist sees the difficulty in every opportunity; an optimist sees the
opportunity in every difficulty."
6. Act
out your desired attitude
If
you find yourself stuck in one attitude, do something different. Sometimes actions can override
attitudes. Smile when you are sour and
you may begin to feel happy. Go for a
walk when you are angry and you may begin to enjoy the day. Act out your desired attitude, and your
attitude may adjust to your actions.
7.
Plan for success
Focus
forward instead of on the present. If
the present is unbecoming, then focus on changing the future for the
better. Make a new goal to work towards. Plan for something exciting and begin
preparing for that time. A future focus
can improve your present attitude.
8.
Surround yourself with positive company
Nothing
zaps your attitude more than dismal company, but nothing improves your attitude
more than being around a positive person.
Find someone who inspires you and make them a part of your life. Also, stay clear of those who bring you down
and make you feel worse about your life and encourage a bad attitude.
9. Be
productive
Nothing
brightens a mood like a job well done.
Get off your duff and get moving!
Clean the house, clean your car, clean off our desk, or do a load of
laundry, fold it, and put it all away.
If you are in a bad attitude and can’t shake it, couch potatoing it will
not solve your attitude problems. Make
something happen and watch your bad day dissolve away.
10. Choose
your attitude intentionally
Contrary
to popular American opinion, we are in charge of our actions and our
attitudes. Our actions and our attitudes
are our choice, not to be blamed on our parents or any other person. We decide how we act and how we behave. Choose well.
If you don’t like your attitude, change it.
Tuesday, April 17, 2012
Green Birthday Party Ideas
![]() |
| Vintage 'Eco Green' Party Pennants - Merry Go Round HANDMADE |
green party ideas
I scoured the web for ideas on green birthday parties. Here are a few themes that surfaced in my search:
Dinosaur Birthday Party
Frog Birthday Party
Bug Birthday Party
Pink & Green Birthday Party
Money Birthday Party
Lepracaun Birthday Party
Shamrock Birthday Party
Picnic Birthday Party
Green Train (Percy) Birthday Party
Caterpillar Birthday Party
John Deere Birthday Party
Then finally, my husband and I had a breakthrough. Green . . . green . . . a GREEN birthday party. We decided to "Go Green" and plan an environmentally conscious and friendly party!
We have only just begun planning for my son's Going Green Birthday Party, but I will post more as I go along!
Here's a generic copy of the invitation we e-mailed to his guests:
Wednesday, April 11, 2012
How to Arrange Picture Displays on a Wall: Six Stylish Designs
I hope you enjoy these six frame arrangements that have been prepared especially for my blog readers! Remember if you want your own custom Room E-design which includes a frame arrangement design, check out my Etsy Shop Designing Life for more details!
![]() |
| Seven 4 x 6 frames with connecting ribbon |
![]() |
| One 4 x 6 frame, two 5 x7 frames, and one 8 x 10 frame |
![]() |
| Four 4 x 6 frames and one 8 by 10 frame |
![]() |
| Three 4 x 6 frames, two 5 x 7 frames, and one 8 x 10 frame |
![]() |
| Three 4 x 6 frames and two 8 x 10 frames |
![]() |
| Four 4 x 6 frames and two 5 x 7 frames |
Friday, April 6, 2012
Tips for "Picture Perfect" Picture Hanging
![]() |
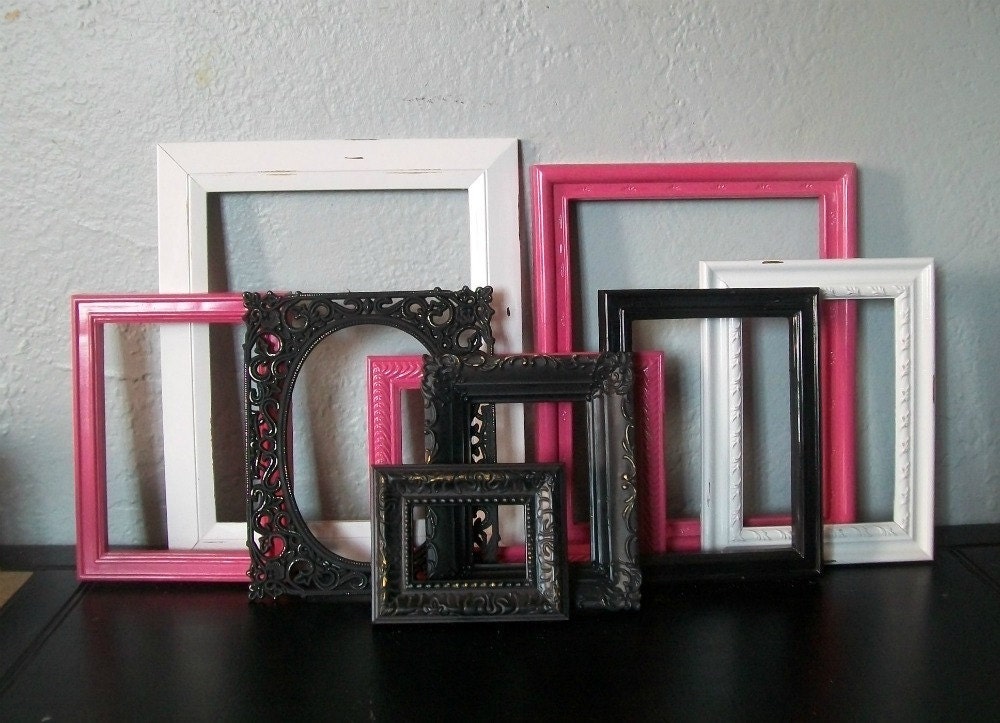
| Upcycled Frames by One Vintage Rose Etsy Shop |
Even though I have an interior design background, let me make one thing clear . . . my interior design teacher never held a class on hanging pictures. All of the sudden after completing four years of college with a BA in Art, I walk into a job interview and they ask me to hang some decorative frames on a wall. What?! Fortunately for me, I'm very resourceful. I took the tools provided and hung the frames on the wall. The only comment they made was that I hung them a little high . . . lol, I had overcompensated for my shortness and they were about two inches higher than they technically should have been.
Suffice it to say, I had to learn how to hang pictures just the same as anyone else has to learn. It takes practice, it takes attention to detail, and it takes a lot of patience. Alright, I guess it does take an eye for design to get the placement visually appealing, but I know you can do it.
Here are some tips that I've learned along the way that make picture hanging that much easier:
![]() |
| Stanley Measuring Tape via Amazon.com |
While this may seem elementary (my dear Watson), it isn't. We all think we are just that good and think that if we just eyeball it we'll get the frames hung at the same height. No. Not really. I'm not even that good. And yes, I learned the hard way. I have a wall that still haunts me (don't know why I haven't fixed it) . . .
![]() |
| Stanley 43-511 Level via Amazon.com |
Granted, most times I really can eyeball how straight a frame is by looking at it, but there are a surprising amount of people who absolutely couldn't hang a picture straight if their lives depended on it. Even when I think I've got the frame perfectly straight, this girl uses a level. So save your guest's nerves some strain and get those frames leveled out using a level.
| Clothes Pin Marking Tool Via The Scrap Shoppe Blog |
Some pretty fabulous tools exist to help you get your pictures hung. For instance, the Hang & Level. You hang your photo on the tool, then press a little button to mark your nail spot. Even with this product, you still need a measuring tape and a level. This just saves you the torture of placing your picture frame up on the wall in the exact right spot, pulling it off, then missing the "mark" and hanging it crooked anyway. Been there, done that. Cool tool.
Alternate and cheaper option (thanks to The Scrap Shoppe Blog) . . . take a clothes pin and hammer a nail through it. Hang the picture from the nail on the clothes pin, hold the top of the clothes pin, place the picture where you want it hung, then push the frame towards the wall to leave a mark where you need to place the nail. Voila, cheaper = smarter!
![]() |
| Paper Bag Trick via BHG.com |
No paper bags are not just for groceries. I found this awesome little trick on Pinterest (originally from Better Homes and Gardens) and am in love. Place your frames on top of a paper bag (you may need to cut open and lay out the paper bag). Trace the frames and cut out the shapes. Take the frame shapes to your wall and use painters tape to attach them to the perfect spots on the wall. Move them around as needed to find the best placement. And yes . . . you still need a measuring tape and a level.
P.S. BHG says to use Kraft Paper . . . so let's just call using paper bags my cheaper version of the same principle.
use your imagination
Just because you've been at tons of people's houses where they hang one piece of art on an entirely empty wall doesn't mean you need to be that boring. Sorry boring wall folk . . . add some spice!!! Try making a collage of frames with pictures, landscapes, and creative photography. Create a zig zag of frames across the back of your sofa! Whatever you choose to do, just remember to be creative and use that imaginarium aquarium . . . (brain). Think out of the frame ;-)
Wednesday, April 4, 2012
My Upcycling Project: Refinishing Vintage Glassware


This project was a hard project to complete. I had to obliterate the beautiful red tint that existed on the 1950's Ruby Red Teardrop Compote in order to upcycle the glass and fix it's unfortunate flaws created by time's passage. I'm all for keeping vintage and antiques as is flaws and all, but not when I'm attempting to sell them. Let's face it, the scratches and blemishes that give a piece character also make them unsellable and less valuable to the consumer. So though I loved this Ruby Red Teardrop Compote, I began a project to make it a perfect upcycled piece sellable and desirable by all.I began my project by removing the red tint that had become scratched over the years. My first attempt utilized finger nail polish remover and a cotton ball. That would have taken a while . . .
I then decided to try out the copper scrubber that my husband told me is great for scrubbing glass without scratching the glass itself. Here's the product in case you were interested: Chore Boy Copper Scrubber. This really took me a lot of time and muscle power to scrub each teardrop on the compote and remove every single grain of red paint. However, it was thankfully quicker than the nail polish remover.
Finally after much scrubbing, scraping, and rubbing, I had a clear surface. A starting place for a new compote . . . a brightly colored refinished compote.
Now I needed my color to make this piece pop. I searched all over the craft store for the right product. I checked the paint section, the glass painting section, the beading section, the glassware section, then finally I found my product of choice in the spray paint section. Basically, it is a translucent paint for glassware, metal, tile, and other like surfaces. And it was the PERFECT color.
So I set up a plastic sheet on my sidewalk outside my house, shook the can for two minutes, popped off the top, and slowly began working over the surface with the paint. I didn't want the color too deep, so I really took my time. It looked stunning! I even was able to lightly coat the stem just like the Ruby Red color had been previously on the stem. I'm in love.
I am so pleased with the color and the look of this piece. Unfortunately, today's forecast is rain, rain, rain, so I really couldn't get enough light to make these pictures perfect. I'll take what I can get!
Here is my Before and After shot!
I'll be sure to post when I put this up on Etsy! Right now I'm still trying to figure out how much to charge with all the time I spent on the project and the price of the paint. Now I know how to upcycle and refinish glass items, so fun!
Comment suggestion:
Let me know if you've ever refinished glassware. What's your favorite paint? Do you use stencils? Maybe the etching product?
Thursday, March 29, 2012
Upcycling with Blackboard Paint
Let's face it, blackboard paint rocks. There is something about a matte surface that can be changed at the whim of a chalk tip that is mesmerizing. I love that blackboard paint can be any color not just black. Just like an empty sheet of paper beckons me, anything covered in blackboard paint calls to me, "Create!"
Tonight, I am talking about some amazing examples of items that were upcycled using blackboard paint.
upcycled paintings
Whether you have a painting that belonged to your great uncle or a random painting from a yard sale, that tacky painting has more potential than you might think. If the painting is acrylic, a print, or on board, simply paint over the painting with blackboard paint! As simple as that you have a framed blackboard.
If you do not have any unseemly paintings, you can actually buy a frame that when the glass is removed has MDF board behind it. Paint the MDF with blackboard paint and you have a framed blackboard surface on which to plan your days.
Last option for an upcycled framed blackboard. You can actually paint over glass with blackboard paint! If you know that no one is going to come along and try to scratch your blackboard with their fingernails . . . *screeeeeeecccchhhh* . . . then take any frame with glass and upcycle it into a blackboard! Note: Scratching may remove blackboard paint from glass.
upcycled wine bottles
Some wine bottles are so pretty. It feels shameful to throw away the pretty glass shapes and now you don't have to, upcycle them instead! Simply prime the glass bottles with Rustoleum primer, then paint the wine bottles with the blackboard paint! Simple as that you have an excellent way to remark on your days, label your flowers, or even remind yourself what vintage the wine was.
This concept works with bottles of all shapes and sizes. Consider upcycling old canisters, spaghetti jars, baby food jars, and older plates. Think about a wall plate display with all blackboard painted plates! Beautiful and resourceful!
upcycled cabinet doors
If you know a friend who is redoing their kitchen, stand in line for their cabinet doors. Treasures in disguise these doors make great blackboards! Sand down the middle portion, sand the rest if you'd like to change the color, then lay down the color. Remember, you can make blackboard paint in any color you want, so get creative! Match a blue board with green chalkboard paint. Paint a purple and pink polka dot border with a hot pink center. Are their boundaries with chalkboard paint? I see no lines!
upcycled platter
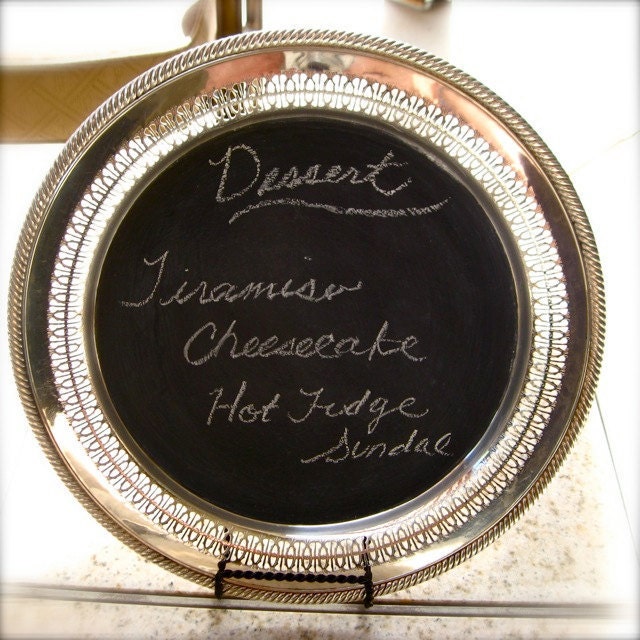
When is a platter not a just a glorified tray? When it's a blackboard! Find a vintage platter from a yard sale or a tray from a thrift store and you are in business. Rough up the surface of the tray, then apply a primer. Apply your blackboard paint and ta da! You have a beautiful trimmed blackboard. Classy and environmentally conscious! Saving the world one platter at a time!
Consider that can be applied to other metallic items. Old watering cans, canisters, even cans from canned food can be upcycled with blackboard paint. My suggestion, search Pinterest, Google, or Etsy to find ideas about other possible metal blackboard projects.
upcycled furniture
Granted I wouldn't paint just any piece of furniture with blackboard paint. Like this beautiful antique to the left. It would have to be mighty dinged up for me to take away an antiques natural beauty for the sake of a blackboard project. However, I know of lots of furniture that is dinged up, has paint chipping off, or never looked good to begin with that would benefit greatly from being upcycled.
An old chair that needs some TLC is a great candidate. A child's dresser can be painted with blackboard paint and then you can label the drawers. A bookshelf can be painted on the sides with blackboard paint and a contrasting color can go inside each shelf. The options are endless and furniture supplies so much wonderful surface area for creativity. Be sure to chalk it up after painting it. Think polka dots, stripes, flowers, beautiful quotes, and even miniature pieces of artwork. Never leave your blackboard empty, chalk it up!
Last but not least, no discussion about chalk board paint is complete without a Blackboard Paint Recipe! Since I first learned about the recipe from Martha Stewart, I will always give credit to my original source. Here she goes:
Blackboard Paint Recipe
1 cup of flat latex paint in your desired color
2 tablespoons of unsanded tile grout
Where to Buy
Lowes
Home Depot
Amazon.com
Tonight, I am talking about some amazing examples of items that were upcycled using blackboard paint.
![]() |
| Blackboard with Frame - Miss Mustard Seed |
Whether you have a painting that belonged to your great uncle or a random painting from a yard sale, that tacky painting has more potential than you might think. If the painting is acrylic, a print, or on board, simply paint over the painting with blackboard paint! As simple as that you have a framed blackboard.
If you do not have any unseemly paintings, you can actually buy a frame that when the glass is removed has MDF board behind it. Paint the MDF with blackboard paint and you have a framed blackboard surface on which to plan your days.
Last option for an upcycled framed blackboard. You can actually paint over glass with blackboard paint! If you know that no one is going to come along and try to scratch your blackboard with their fingernails . . . *screeeeeeecccchhhh* . . . then take any frame with glass and upcycle it into a blackboard! Note: Scratching may remove blackboard paint from glass.
![]() |
| Upcycled Blackboard Wine Bottles - No Place Lyke Home |
Some wine bottles are so pretty. It feels shameful to throw away the pretty glass shapes and now you don't have to, upcycle them instead! Simply prime the glass bottles with Rustoleum primer, then paint the wine bottles with the blackboard paint! Simple as that you have an excellent way to remark on your days, label your flowers, or even remind yourself what vintage the wine was.
This concept works with bottles of all shapes and sizes. Consider upcycling old canisters, spaghetti jars, baby food jars, and older plates. Think about a wall plate display with all blackboard painted plates! Beautiful and resourceful!
![]() |
| Cabinet Door Chalkboard - The Door Stop |
If you know a friend who is redoing their kitchen, stand in line for their cabinet doors. Treasures in disguise these doors make great blackboards! Sand down the middle portion, sand the rest if you'd like to change the color, then lay down the color. Remember, you can make blackboard paint in any color you want, so get creative! Match a blue board with green chalkboard paint. Paint a purple and pink polka dot border with a hot pink center. Are their boundaries with chalkboard paint? I see no lines!
![]() |
| Silver plated Blackboard Platter - Pumpernickel and Wry |
When is a platter not a just a glorified tray? When it's a blackboard! Find a vintage platter from a yard sale or a tray from a thrift store and you are in business. Rough up the surface of the tray, then apply a primer. Apply your blackboard paint and ta da! You have a beautiful trimmed blackboard. Classy and environmentally conscious! Saving the world one platter at a time!
Consider that can be applied to other metallic items. Old watering cans, canisters, even cans from canned food can be upcycled with blackboard paint. My suggestion, search Pinterest, Google, or Etsy to find ideas about other possible metal blackboard projects.
![]() |
| Antique Furniture Blackboard - Marley and Lockyer |
Granted I wouldn't paint just any piece of furniture with blackboard paint. Like this beautiful antique to the left. It would have to be mighty dinged up for me to take away an antiques natural beauty for the sake of a blackboard project. However, I know of lots of furniture that is dinged up, has paint chipping off, or never looked good to begin with that would benefit greatly from being upcycled.
An old chair that needs some TLC is a great candidate. A child's dresser can be painted with blackboard paint and then you can label the drawers. A bookshelf can be painted on the sides with blackboard paint and a contrasting color can go inside each shelf. The options are endless and furniture supplies so much wonderful surface area for creativity. Be sure to chalk it up after painting it. Think polka dots, stripes, flowers, beautiful quotes, and even miniature pieces of artwork. Never leave your blackboard empty, chalk it up!
Last but not least, no discussion about chalk board paint is complete without a Blackboard Paint Recipe! Since I first learned about the recipe from Martha Stewart, I will always give credit to my original source. Here she goes:
Blackboard Paint Recipe
1 cup of flat latex paint in your desired color
2 tablespoons of unsanded tile grout
Where to Buy
Lowes
Home Depot
Amazon.com
Subscribe to:
Posts (Atom)